Script
Importing Scripts
FilmBase supports importing scripts in three formats:
- FDX (Final Draft): Best option. Preserves all metadata, formatting, and can import existing breakdown tags. The script's scene numbers are kept, including letters such as A12 or 12AA, and an FDX export writes them back.
- PDF: Read from the text in the file, so check the result. You can select specific page ranges. A scene starts at each scene heading: a line that begins with INT. or EXT. and is written in capitals, such as INT. KITCHEN - DAY. The printed scene numbers are kept, such as 12, 12A or A12. A number in the right margin counts, and so does one printed after the heading when every scene has one and they rise in order. A number that is part of a location, such as STUDIO 54, stays in the location.
- Plain Text / Fountain: Simple text-based screenplay format.
How to Import
- Navigate to Script > Script Breakdown in the sidebar.
- On a project with no script yet, the page shows a No Script Imported overlay. Click Import Script in the center. (Use Existing Script reuses a script already in the project, and Create Script starts a blank one.)
- Browse and select your script file (.fdx, .pdf, or .txt).
- Wait for parsing to complete: you'll see a scene count summary.
Merging Characters and Locations on Import
Scripts often name one person or place two ways, such as DOT and DOT ABERNATHY. The import dialog lists the characters and locations it found, with the scenes and lines for each, and marks names that may be the same as Possible duplicate.
- Tick two or more names that are the same person or place.
- Choose the name to keep and click Merge.
- To leave a flagged name as it is, choose Keep the name. To take a merge back before saving, choose Undo merge.
Nothing is saved until you import, and the script text is not changed. The other name is kept as an alias, so the merge holds when you edit the script or import a revision.
Revision Imports
When importing a revised script, FilmBase uses scene matching to preserve your existing scheduling data (stripboard assignments, breakdown tags). Locked scene numbers are preserved, and new scenes receive suffix letters (e.g., 5A, 5B).
Each shooting block can have one script assigned to it. You can assign the same script to multiple blocks, or import different scripts for different blocks.
Script Editor
The Script Editor provides a formatted view of your screenplay with full editing capabilities.
Formatting
Standard screenplay elements are displayed with industry formatting: scene headings, action, character, dialogue, parenthetical, transition, and dual dialogue. Use Ctrl/Cmd+B, Ctrl/Cmd+I, and Ctrl/Cmd+U for bold, italic, and underline.
Scene Numbering
Scenes are automatically numbered, and inserting or deleting a scene keeps every number correct on the spot. When your script goes to production, use the lock button in the editor toolbar to freeze the existing scene numbers.
While locked, a scene you insert is numbered off the scene before it with an A/B suffix (add a scene after Scene 2 and it becomes 2A, the next 2B), so your locked numbers never shift. The lock also governs revision imports: matched scenes keep their numbers and genuinely new scenes pick up suffixes.
To unlock, click the lock again. FilmBase asks what to do with the numbers: Renumber scenes numbers every scene in order now, so 2A becomes 3, and Keep numbers leaves every number as it is. Either way the script is unlocked, and from the next time a scene is added, removed, merged, split or moved, every scene is renumbered in order. Cancel keeps the lock. One Undo puts the lock and the old numbers back.
Deleting a scene, or merging it into the scene above, removes its shots and their images with it, and the later scenes are renumbered. Undo brings the scene, its shots and their images back.
Omitting Scenes
When a scene is cut but you need the numbering left alone, omit it rather than delete it. Right-click the scene in the navigator and choose Omit Scene.
Omitting is non-destructive. The dialogue and action stay in the script, and the scene drops out of the schedule, the reports, and the breakdown. To bring it back, right-click it in the navigator and choose Restore Scene (Un-omit).
In a PDF, Word or plain-text export of the script, and in sides, an omitted scene prints as its scene number and a single OMITTED heading. A Fountain export keeps the omitted scene in the file without printing it.
Revision Tracking
Revisions follow the industry-standard color order: White, Blue, Pink, Yellow, Green, Goldenrod, etc. Mark paragraphs as revised to track changes across drafts. Each revision is color-coded in the editor.
Revision marks go out with the script. In a PDF, each line of a revised paragraph has an asterisk in the right margin, as in the editor. A Final Draft export writes each revised paragraph with its revision, so Final Draft shows it as revised and importing the file brings the marks back.
Title Page
A WYSIWYG title page editor is built in. Fields include: Title, Written By, Based On, Draft, Draft Date, Contact, and Copyright. Toggle between the script and title page from the toolbar.
When you import a Final Draft or Fountain script, its title page comes with it. A Final Draft export always carries the title page, and PDF, Fountain and Word exports include it when Include title page is on.
Exporting the Script
Export the script as PDF, Final Draft (.fdx), Fountain (.fountain), Word (.docx) or plain text (.txt). Pick the format at the top of the export dialog; the options change with it.
A script PDF prints the pages as the editor shows them: each page breaks where it does in the editor and carries the same page number. Page 1 has no number, and the title page is not counted. With Include outlines, and in a lined script, the text flows onto the pages instead. The Word file breaks its pages where the editor does too.
Find & Replace
Full find and replace with options for case-sensitive and whole-word matching. Navigate matches with find next/previous, replace single occurrences, or replace all.
Scene Navigator Panel
A collapsible panel on the left lists all scenes in your script. Click any scene to jump directly to it in the editor. Use this for quick navigation through long scripts.
Script Notes
Attach notes to any paragraph in the script. Notes appear as expandable indicators alongside the text and are color-coded for easy identification. Click the note indicator to view, edit, or delete notes.
Other Features
- Full undo/redo support
- Character name autosuggest when typing character paragraphs
- Scene heading suggestions (INT./EXT., locations, time of day)
- Reformat mode to change paragraph types
- Zoom controls
- Right-click for cut, copy, paste, delete, and select all
Script Breakdown
Script breakdown is the process of identifying and tagging all production elements in each scene: props, wardrobe, vehicles, special effects, extras, and more.
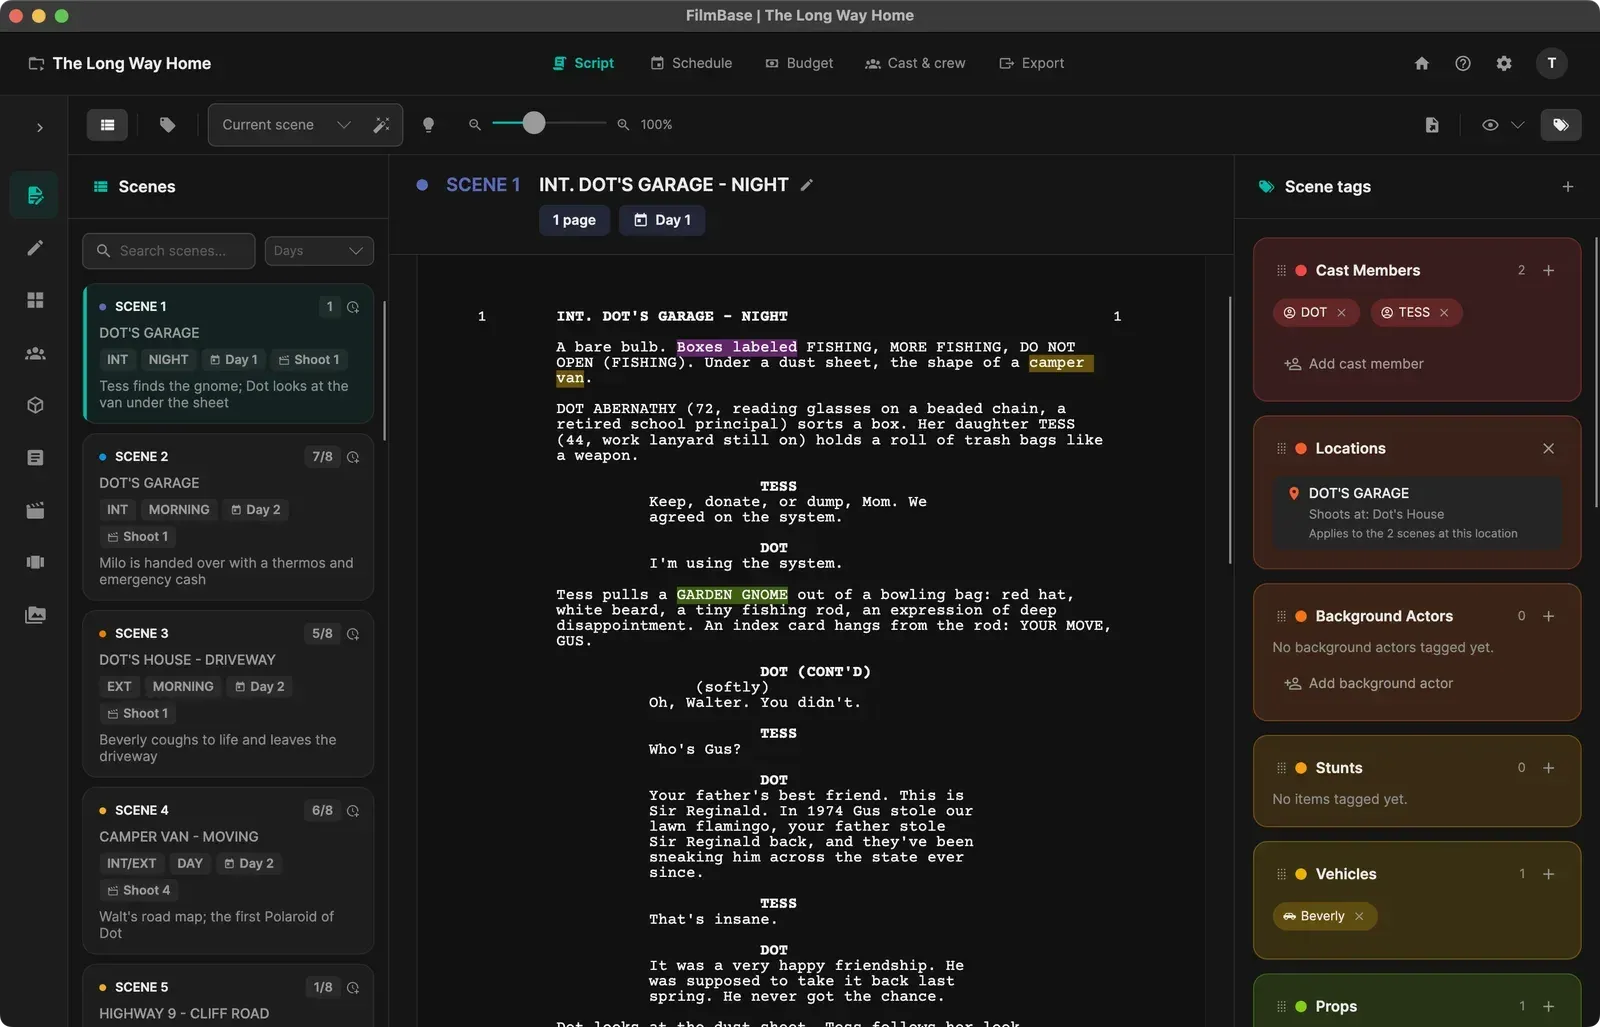
Manual Tagging
- Highlight text in a script line that represents an element (e.g., "Red Sports Car").
- A tagging popup appears near your selection.
- Select the appropriate category (e.g., "Vehicles").
- The text is underlined in the category color and added to the element list.
Auto-Tagging
FilmBase includes auto-tagging that runs entirely on your own computer. No internet connection is needed. There are two modes:
- Understanding engine: Fast, lightweight entity extraction. Good for quick passes.
- Reasoning engine: Combines keyword matching with deeper, context-aware analysis.
Suggestions appear inline. You can accept or dismiss each one individually. A confidence threshold (default 0.5) filters low-confidence matches. Character names and common camera directions are automatically excluded.
Element Categories
FilmBase supports 20 breakdown element categories:
Scenes Panel (Left)
The collapsible left panel lists all scenes in your script. Each entry shows the scene number, story day, page count, and estimated duration: all editable inline. Use the search bar to find scenes by name or number, and the shoot day dropdown to filter to a specific day's scenes. Click a scene to load it in the breakdown view.
Scene Tags Panel (Right)
The collapsible right panel shows all breakdown tags for the currently selected scene, organized by category (color-coded cards). From this panel you can:
- Click + Add Tag on any category to manually add a tag without selecting text
- Add or remove tag categories from the panel
- Edit tag names inline by clicking on them
- See the tag count per category at a glance
Right-Click Menus
Right-click a tag in the Scene Tags panel for:
- Edit Tag Name: Rename the tag
- Apply to All Occurrences: Find and tag every instance of this text across all scenes
- Promote to Element: Add this tag to the Elements Manager
- Link to Existing Element: Connect this tag to an element already in the manager
- Unlink from Element: Remove the element connection
- Remove Tag: Delete the tag from this scene
Right-click an auto-tag suggestion for:
- Change Category: Move to a different category (Props, Wardrobe, Set Dressing, etc.)
- Accept Tag: Confirm the suggestion
- Dismiss: Remove the suggestion
Characters
The Characters view lists all characters extracted from your script. Each character shows their dialogue count, scene count, and assigned actor. The character's avatar shows the assigned actor's photo from their contact card, and details save on their own, no Save button.
- Actor Assignment: Assign cast contacts to characters via a searchable dropdown. Primary actor assignment is tracked. Assigning an actor to a character that already has one asks Replace [actor] with [actor] as [character]? before it changes anything, here and on the contact's Cast details. A character has one actor at a time. The earlier actor stays a contact and keeps their rows on call sheets already made.
- Cast Numbers: A cast number you set, or one given earlier, is kept. Characters without a number get the next one after the highest in use.
- Cast Tier: Set Lead, Supporting, Day Player, or your own tiers right in the header. The tier feeds the cast budget.
- Reordering: Drag-and-drop to reorder characters. Auto-numbering updates based on position.
- Scene Presence: See which scenes each character appears in at a glance.
Merging Characters
When one character appears under two names, select them on the Characters page and choose Merge. The dialog lists what moves to the character you keep: scenes, the cast assignment, Day out of Days days, call sheet rows, connected elements and budget lines. The other names become aliases, shown as "Also called" on the character, so the merge holds through script edits and revision imports. The cues in the script stay as written unless you tick the option to change them too. Every merge can be undone.
Connected Elements
Use Connect an element to link the props, wardrobe, and vehicles that belong to a character: their gun, their coat, their car. Connections are anchored to the character, so they work whether or not the script has been tagged yet, and they also appear under Connected Characters on the element itself.
Each connection has a small used in picker, a mini magic sheet for that one element. Pick the scenes a prop is carried in, or the story days an outfit is worn on. Wardrobe defaults to story days (one look per day); other elements default to scenes.
Wardrobe
Each character's Wardrobe tab lists their costume items. An item is an element in the Wardrobe category, connected to the character, so it has a rate and can be imported into the budget like any element.
- Open Script > Characters, pick a character and switch to Wardrobe.
- Type an item's name and choose Add item, or connect a wardrobe element tagged in the breakdown.
- Choose the story days it's worn (or switch to By scene), and give it a rate.
FilmBase finds the shoot days those story days are scheduled on. A shoot day counts once, however many of the item's story days it covers, and that count is the item's usage days, so its budget line follows the schedule.
In an episodic show, items the same person wears in other episodes are listed under the items; choose Use in this episode to add one, so the costume list stays one list.
The Actor's Unavailability
When a character has an actor, their unavailable dates can be set on the Characters page, with the same date picker as the contact. The panel is labeled with the actor's name. The schedule's conflict checks, the optimizer and the Day out of Days all use these dates.
The dates belong to the actor, not the part, so they apply to every character that actor plays.
Reference Images
Build a visual board on any character: look, wardrobe, casting. Images sync with the project, and the same gallery is available on elements and locations.
Elements Manager
A centralized view of all breakdown elements across your script. Filter by category, search by name, and edit element properties.
Budget Integration
Elements can be linked to budget line items. Enable Auto Sync on an element to automatically keep the budget line item's rate, quantity, and multiplier in sync. Changes in either direction are reflected bidirectionally.
- Import elements to budget (creates corresponding line items)
- Usage days are calculated automatically based on shoot day assignments
- Vendor assignment from contacts flagged as suppliers
- Default rate, unit, and quantity per element
Connected Characters
When you connect an element to a character (from the Characters page), it appears here under Connected Characters, chips showing which characters use the element, and in what relationship (uses, wears, drives…). A reference-image gallery is available on every element too, syncing with the project.
Location Elements
Real-world locations created on Schedule > Locations appear here as elements in the Locations category. Their shoot days come from the scenes whose headings are assigned to them, no tagging needed. Selecting a location element shows a location form: address, Google Maps link (GPS is read from it), location contact, and availability dates, kept in sync with the Locations page both ways. Set a rate and import a location to the budget like any other element.
Sides
Sides are the specific script pages needed for a given shoot day. Select a shoot day from the dropdown, or pick scenes manually to preview and export sides.
- Selection modes: Choose by shoot day (auto-selects scenes) or manual scene selection
- Preview: Live preview with proper screenplay formatting and page count
- PDF Export: Standard screenplay formatting with scene numbering, revision color stripes, and page numbers
- Zoom controls for comfortable previewing
Shotlist
Plan individual shots for each scene with detailed metadata.
Per-Shot Data
- Shot type: Wide, Medium, Close-up, etc.
- Shot movement: Static, Pan, Tilt, Dolly, Crane, Handheld, Steadicam, etc.
- Shot angle: Eye level, Low angle, High angle, Dutch, Bird's eye, etc.
- Lens: Specific lens specification (e.g., "50mm f/1.4")
- Equipment notes: Additional gear requirements
- Description and estimated duration
- VFX / Sound flags: Mark shots requiring visual effects or special sound work
Automatic Shot Diagrams
Any shot without its own image shows an automatic, hand-drawn diagram of the framing, so the list reads like a board before anything is drawn. The diagram follows the shot: the shot size sets how tight it frames, and the camera angle re-stages the whole frame (high and low tilt the view, Dutch cants it, and a bird's-eye looks straight down). Attach your own image any time to replace it, and diagrams export at a clean 16:9.
Script Context Panel (Right)
Open the collapsible right panel to see the current scene's script text alongside your shot list. This is essential for lining: it shows the script paragraphs with a zoom slider for comfortable reading.
Script Coverage (Lining)
Enable Lining Mode to select script paragraphs covered by each shot. Coverage is visualized with color-coded lanes alongside the script text, showing exactly which dialogue or action each shot covers. Export to PDF or Excel.
Right-Click Menu
Right-click any shot card for:
- Display Options: Toggle which fields show on cards: Thumbnail, Type, Movement, Angle, Lens, Equipment, Description, VFX Notes, Sound Notes
- Shot Color: Assign a color category: Master (Blue), Coverage (Red), VFX (Purple), B-Roll (Green), Insert (Yellow), Special (Pink)
- Characters in Frame: How many people the diagram shows (1 to 5)
- Subject Pose: Standing, Sitting (at a table), or In a car
- Environment: Auto (from the scene heading), Interior, or Exterior
- Delete Shot: Remove the shot
The Characters, Pose and Environment options appear only while a shot is using the automatic diagram (no uploaded image).
Storyboard
Visualize your shots as storyboard panels with two viewing modes:
- Cards View: Grid of shot cards with images, descriptions, and metadata
- Timeline View: Horizontal sequence showing shots in order
Animatic Playback
Watch your storyboard as a movie with play/pause/stop controls. Playback runs at 24fps with the current shot highlighted. Supports seeking, looping, and total duration tracking.
Automatic Shot Sketches
Panels without an uploaded image show an automatic 16:9 sketch drawn from the shot's size, angle and subject, in a loose hand-drawn pencil style with shaded figures and grounding shadows. The angle restages the frame (a bird's-eye becomes a true top-down view of the scene), several characters are blocked with depth rather than lined up flat, and interiors and exteriors are detected from the scene heading and drawn with depth. Right-click a panel to set the characters, pose and environment. Change a shot's pose or cast count on the Shotlist and the Storyboard sketch updates at once; it's the same shot in both places.
Image Management
Upload your own image per shot panel to replace the sketch; the upload control appears on hover so it never hides the art. Images are stored locally in your project's media folder. Export storyboards to PDF (at a clean 16:9) or generate an MP4 video of your animatic timeline.
Captions and Sound on the Timeline
Under the shot lane you can add text lanes for captions, slugs and notes, and audio lanes for music, effects and voice-over.
- Add caption and Add sound put a clip at the playhead; double-click a lane to add one where you click.
- Drag a clip to move it and drag either edge to trim it. Edges snap to shot boundaries, the playhead and other clips.
- Double-click a caption to edit its text.
- Right-click a lane to rename, mute or remove it.
Sounds come from the Media Pool, and a clip starts at the length of its file. While you play, the caption under the playhead shows over the picture and the sound plays with it. Moving the playhead by hand pauses playback.
Export to MP4 burns the captions into the picture and mixes the audio lanes into the soundtrack. Muted lanes are left out.
Panels & Right-Click
In Cards view, the left panel shows a scene navigator and the right panel shows the script context (same as the Shotlist view). Drag the script panel's edge to resize it and the width sticks; close it and the board reflows to fill the space. Switch between Cards and Timeline from the toggle on the left of the toolbar. Right-click any storyboard card for Display Options, Shot Color assignment, and Delete Shot: identical to the Shotlist context menu.
Magic Sheet
The Magic Sheet is a matrix view showing which elements and characters appear in which scenes. Rows are elements (grouped by category), columns are scenes.
- Click any cell to toggle a tag on/off for that scene
- Filter by category: Cast, Props, Wardrobe, Extras, Vehicles, and more
- Filter scenes with the toolbar box: scene numbers (8), ranges (1-5), or heading text (INT, NIGHT), combined with commas. Elements outside the visible scenes drop out of the rows
- Switch the columns between Scenes and Story Days with the toolbar toggle: Story Day view collapses each day's scenes into one column, and every scene header carries a story-day chip
- Tagging works in Story Day view too: a cell stands for the whole day, so clicking it tags the element across all of that day's scenes at once (or clears it from them all)
- Shows total occurrence count per element and per scene
- Cast assignments automatically create character-scene links
Media Pool
Everything in the Project in One Place
Script > Media Pool lists every file in the project: music, sound effects, voice-over, images and documents you import here, and the storyboard frames, reference images and expense documents attached elsewhere.
Select a file to preview it, play a sound, and see where it's used: which shot, reference board, expense or timeline.
Importing
Choose Import, or drop files from your computer onto the page. Files are copied into the project and travel with it to your team. The same file imported twice is kept once.
Sounds you import here are what the storyboard timeline's audio lanes use.
Bins, Search and Delete
Make bins to file media by scene, department or anything else, and nest them. Drag a file onto a bin, or right-click it and choose Move to bin. The views at the top show everything, or just images, audio, video, documents or what was added this week. Search and sort the files above the grid.
Deleting a file you imported removes it from the project and from any timeline that plays it; you're told where it's used first. Files attached elsewhere are deleted where they were attached.