Schedule
Stripboard
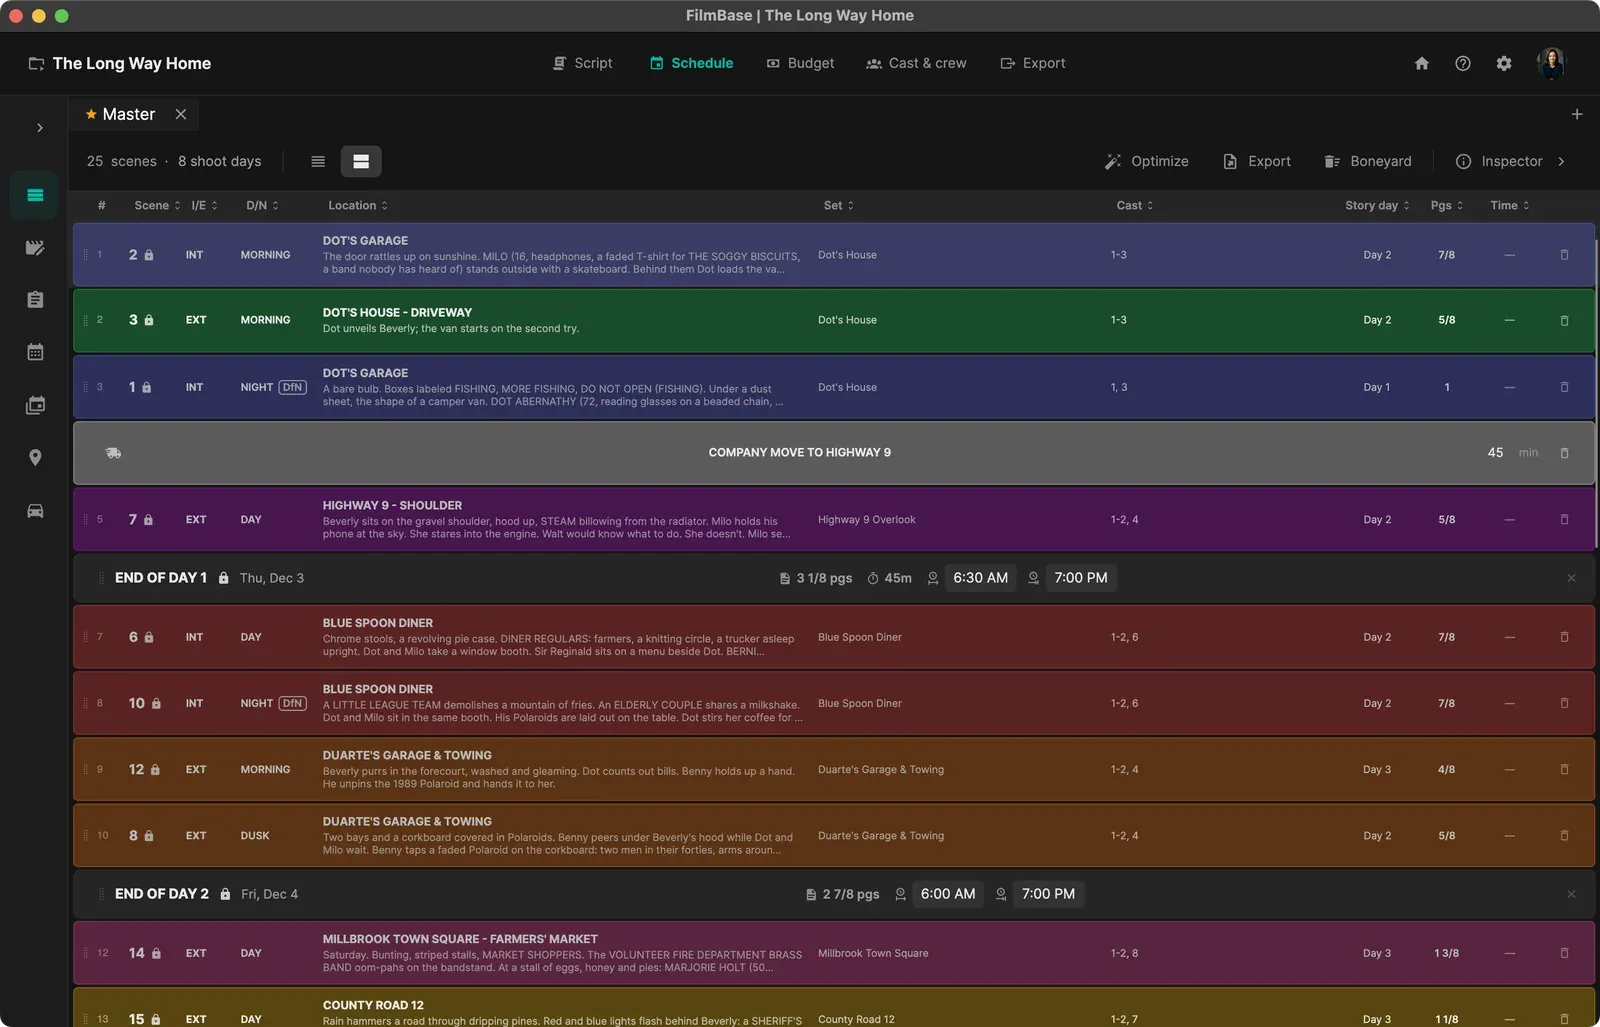
The stripboard is the main scheduling tool on a production. Each scene is a colored strip, and strips are arranged into shoot days separated by End of Day markers.
Shooting Blocks & Scenarios
Every new project starts with a default shooting block. You can create additional blocks (e.g., "Second Unit", "Reshoots") to organize different phases of production. Each block has its own script and schedule. A shooting block is a Shoot lane on the Production schedule, so you add one there with Add lane.
Within each block, you can create multiple scenarios: alternative arrangements of the same script. Scenarios appear as tabs at the top of the stripboard. One scenario is marked as the master (shown with a star), which is the active schedule used by call sheets and reports. To manage scenarios:
- Click the + button at the top-right of the tab bar and select Create New Scenario
- Right-click any scenario tab to rename, duplicate, set as master, or delete it
- Each scenario tab has its own toolbar with all stripboard actions
Setting Up Shoot Days
Before you can schedule scenes, the block needs to know how many shoot days it has:
- Go to Schedule > Production schedule.
- Type the number of shoot days for the block (e.g., 18) into the shoot days field in the toolbar. With more than one block, the field uses the block chosen in the block picker.
- FilmBase inserts that many End of Day markers down the stripboard and divides the strips between them.
Lowering the number removes days from the end of the block, and their call sheets, transport runs and driver assignments go with them. The notice that follows offers Undo, which brings them back.
The stripboard toolbar shows the block's shoot day count. Click it to go to the Production schedule.
You must set the number of shoot days before using the optimizer. It needs to know how many days it has to work with.
Manually Arranging Strips
You can drag and drop strips to reorder them manually:
- Click a strip to select it, or hold Ctrl/Cmd and click to multi-select
- Drag selected strips to a new position: they'll be assigned to the shoot day based on their position relative to the End of Day markers
- All reordering is fully undoable with Ctrl/Cmd+Z
- Right-click any strip for quick actions: insert day breaks, split scenes, or send to boneyard
Stripboard Optimization
To have FilmBase automatically arrange your scenes into an optimized schedule:
- Make sure you've set your shoot days count (see above).
- Click the Optimize button in the scenario toolbar.
- The Inspector panel opens on the Optimize tab.
Optimization Mode
- Quick: Fast optimization for large schedules (shorter solve time)
- Smart: Balanced approach with good results in reasonable time
- Thorough: Maximum optimization quality (may take longer)
Priority sliders, each shown as a live percentage so you can set the same result again:
- Group locations ↔ Even days: slide left to shoot out each location before moving on (fewer company moves, days may be uneven); slide right to even the page count across days (a location may split across days)
- Actor focus: how hard to compress each performer's hold days, the gap between their first and last day on set
- Follow script order: how strongly to keep scenes in script order against the grouping goals
- Keep locations together: when a location or set covers more than one day, how hard to keep those days consecutive so it isn't left and returned to with another location in between. Turn it up and it outranks Actor focus; set it to zero and gaps are allowed
The Locations, Balanced and Actors presets are shortcuts that move the location and actor sliders for you; drag any slider and the choice becomes Custom.
Hard limits: caps the optimizer can't break. Set them too tight for your day count and no schedule is possible:
- Max pages per day: Prevents overloading a single day
- Max locations per day: Limits how many different physical locations appear in one day
Constraints, at the bottom of the panel: the real-world rules the solve obeys. All three are on by default. Switch one off only to draft a board before the bookings are confirmed, and a dot on the collapsed Constraints header shows when one has been relaxed:
- Cast Availability: never place a scene on a day one of its performers has marked unavailable
- Location Availability: never place a scene on a day its real-world location is marked unavailable
- Minimum Turnaround: keep the required rest hours between a day's wrap and the next day's call, with the hours set just below the switch
Scheduling rules: shape the result without ever making it impossible:
- Keep day/night separate: Prevents mixing day and night scenes in the same shoot day
- Use All Shoot Days: Fills every configured shoot day (on by default). Turn it off to see whether the shoot could fit in fewer days
When a location or set runs across more than one day, the optimizer keeps those days consecutive so you dress it and shoot it out instead of coming back later. It groups by location name, so two differently named locations stay on separate days even when only one has GPS coordinates. The Keep locations together slider sets how firmly, and a high Actor focus can override it when tightening a performer's days is worth the move.
The Optimize panel keeps your mode, sliders, rules, limits, and constraints with the project, so they are set the way you left them the next time you open it.
If your hard limits can't all be satisfied (say, more night pages than your page cap and day count allow with day and night kept separate), the panel warns you up front, with the arithmetic, before it runs.
Every optimization is undoable: press Ctrl/Cmd+Z or the Undo button on the result card and your previous board comes back exactly as it was. Undo also covers edits made on a strip, moves to and from the boneyard, marking a scene as shot, and moves in the Scene Allocator.
GPS Optimization (if your locations have GPS coordinates):
- Minimize Travel Distance: Groups nearby locations together
- Optimize Travel Route: Minimizes backtracking between locations
- Furthest Location Last Day: Schedules the most distant location at the end of the shoot
Click Optimize to run. A progress overlay appears over the stripboard with a status message. When complete, a results summary appears in the Optimize tab and the stripboard is updated with the new arrangement.
Display Options
Customize how the stripboard looks using the toolbar controls:
- Toggle between compact and expanded strip heights
- Show/hide columns: INT/EXT, Time of Day, Location, Set, Cast Numbers, Story Day, Page Count, Estimated Time, Synopsis
- Color strips by location (each place in its own color, with a lighter or deeper shade for each set there), by location in high contrast, or with the industry standard INT/EXT and day/night colors, or apply custom colors
Inspector Panel (Right)
Open the collapsible right panel to inspect and edit the selected strip. What you see depends on what's selected:
- Scene strip: Shows scene header (number, INT/EXT, time of day, location), synopsis, story day, page count, real world set, shooting mode, and the cast list for that scene. A set you type on a strip is kept as typed; the place mapped on the Locations page shows only when the strip has no set of its own
- End of Day marker: Shows the day number and date, editable call time and wrap time, day statistics (scene count, pages), and a turnaround warning if the gap to the next day is too short
- Banner strip: Shows the banner text
Right-Click Menu
Right-click any strip on the board for a full context menu:
- Cut / Paste Below / Cancel Cut: Move strips around
- Inspect: Open the inspector panel for this strip
- Add Banner Strip / Add Meal Break / Add Company Move: Insert special markers
- Change Color: Apply a strip color (INT. Day, EXT. Day, EXT. Night, INT. Night, Dawn/Dusk, plus Teal, Purple, Red, Lime, Indigo, Amber, Cyan, Pink, or Reset to Default)
- Split Scene: Divide a scene into two strips
- Shooting Mode: Set the strip to Day for Day, Day for Night, Night for Night, or Night for Day, or reset it to Auto, without opening the inspector and across a whole multi-selection at once
- Add Cast Member: Assign a cast member to this scene
- Scene Status: Mark as Shot, Mark as Not Shot (Create Pickup), or Mark as Not Shot (No Pickup)
- Move to Boneyard: Remove the strip from the schedule (can be restored later)
- Delete End of Day / Delete Banner: Remove markers. Deleting an End of Day marker removes that shoot day with its call sheet and transport: its scenes join the next day, the later days move up a date, and the block has one shoot day fewer. Undo puts the day, its marker and its documents back
Try creating multiple scenarios to compare different schedule arrangements before choosing your master.
Scene Allocator
The Scene Allocator is a visual, card-based alternative to the traditional stripboard view. Instead of a linear strip list, scenes appear as cards organized into shoot day groups.
How to Use It
- Select a shooting block and scenario from the toolbar (same as the stripboard).
- Set the block's shoot days on the Production schedule (see Setting Up Shoot Days), or add a day here with Add shoot day.
- The left panel shows Unassigned scenes: scenes not yet placed into any shoot day.
- The right panel shows your shoot day cards in a grid. Drag scenes from the unassigned panel onto a day card, or drag scenes between day cards to rearrange.
- Each day card displays totals at a glance: page count, scene count, and estimated time.
Unassigned & Completed Panels (Left)
The collapsible left panel has two tabs:
- Unassigned: Scenes not yet placed into any shoot day. Drag them onto day cards to schedule them.
- Completed: Scenes marked as shot. These are moved out of the active schedule.
Conflict Warnings
Each day card shows a conflict badge if there are scheduling issues: such as turnaround violations, actor double-bookings, or location availability problems.
Call Sheets
Call sheets are the daily documents distributed to cast and crew. FilmBase makes industry-standard call sheet PDFs. When a day is on your schedule, the sheet can fill itself from the stripboard, cast, locations and weather. You don't need a schedule: pick a date and type the sheet in yourself.
How to Make a Call Sheet
- Go to Schedule > Call Sheets in the sidebar.
- If you have no shoot days yet, pick a date and choose Make call sheet. Otherwise pick the day from the day menu at the top (the arrows beside it step from day to day); Add day in that menu adds another.
- When the day is on your schedule, Autofill brings in its scenes, cast and locations. A brand-new sheet for a scheduled day offers this as it opens. The Autofill dialog lists each section, where it is filled from and what the sheet holds now; a section that already holds something starts unticked, so what you typed stays unless you choose to replace it. A day that isn't on the schedule has no Autofill: type the sheet in yourself.
- Fill in the rest in the Form: times, weather, contacts, places, safety, notes, cast, extras and department calls.
- Check it in Page, then click Export.
Changes save as you type: you can come back and edit any call sheet at any time.
A Draft Follows the Stripboard
Once a draft sheet is filled from the schedule, it keeps following the board. Move a scene to another day, reorder the day, change who works it, or edit a location's address, parking or hospital, and the rows you have not edited change with it. A row you edited on the sheet, such as a scene with a time you typed or a location with your own notes, stays as you left it. If that row is no longer on the day, the sheet's checks point it out, for example that a scene is on the sheet but no longer scheduled on this day. You do not need to run Autofill again after changing the board.
Form and Page
Form shows every value of the sheet as a labeled field, in cards that fit your window; the running order, cast and extras tables take the full width. Page shows the sheet exactly as it prints. Click any value on the Page to change it right there, or turn on Edit on the page to see every value as a field.
Choosing What Prints
The list on the left of the Form names every part of the sheet, grouped as Header, The day, Departments and Extra pages. Click a part to jump to it; its checkbox puts it on the printed sheet or leaves it off. A part you leave off stays in the Form, dimmed, so you can still fill it in. Use for new call sheets makes this sheet's choices the production's default.
Templates remember which parts print and which key times show. Apply one to any sheet, or save this sheet's layout under a name. There is one set for episodic shows and one for one-off productions (features, shorts, commercials and music videos). A project offers the set that matches it, and the templates you save are shared by every project of the same kind. Each set has a full sheet and a lean one for short shoots built in.
Turn on Episodic show in Settings › Region and format for a series. Each key contact then gets an episode note (Ep 01 & 02); a film doesn't show that field.
Moving the Whole Day
Shift all times moves the day later or earlier: the crew call, key times, scenes, cast, extras and department calls all move by the same number of minutes, in one step you can undo. Sunrise and sunset stay put.
Checks Before You Send
The Form lists times that look wrong: a shooting call before the crew call, a day over 12 hours, a cast member on set before their call or picked up after it, a time that isn't real, a short turnaround, or a long gap before a meal. The checks handle night shoots that run past midnight. The warnings stay on screen and never print.
Prelims, Finals and Revisions
A new sheet is a prelim, and every page carries a PRELIM mark. Click the status in the toolbar and choose Make final; the mark comes off and FilmBase records what the sheet says. A final sheet does not follow the board: it keeps what it said. When the sheet or the board then differs from it, the status reads Changed since final and lists each change in plain words, including the scheduled scenes and their order, the cast, the locations, department notes, crew calls and the header values. Type a note for the crew and choose Issue revision: the reissue is numbered, and what changed prints in red under the header, so the crew can see the changes without comparing two sheets. Exported file names carry the issue, ending in Prelim or Rev1, Rev2 and so on.
History and Send
History in the toolbar lists the recent changes to the sheet and who made them. Send lists the people on the day, with everyone who has an email address ticked. Save and email saves the PDF and opens a new message in your mail app with those people in Bcc; attach the saved PDF and send it.
Copies for Each Person
Export can make a cast version, without department calls and notes, catering, transport, the crew list and walkie channels. It can also save a copy for each person: their row highlighted, and their name, call and pickup under the header.
What's Included
- Production and versions: Title (the script's title until you type another), company, hotline, script and schedule versions
- Times: Crew call and the key times you add, such as shooting call, meals, first shot and wrap
- Weather: Conditions, low and high, sunrise and sunset, wind, gusts, direction and rain
- Key contacts: Producers, director, assistant directors, director of photography and anyone else you add
- Locations and parking: Address, map link, base camp, tech parking and crew parking
- Safety & emergency: Emergency number, police, fire, nearest hospital, medic and security
- Notes: General notes and the parking rule
- Running order: Scene number, pages, int/ext, day/night, set and description, cast numbers, story day, notes and ETA
- Cast: Character, actor, Day out of Days status, pickup, arrival, call, costume, makeup, hair, ready and on set
- Featured and extras: From the breakdown, with quantity, scenes and call times
- Department calls: Departments that start at a different time from the crew call
- Optional parts: Catering, transport, walkie channels, advance schedule, quote of the day, crew list and location pages
Weather
Autofill fetches the forecast for the first location on the sheet and the date of the shoot day, so nobody is looking up a forecast and retyping it. That needs GPS coordinates on the location and an internet connection; without either, every weather field is yours to type. Fetch the forecast beside the card title gets a fresh reading. Switch between Celsius and Fahrenheit in Settings and every call sheet follows.
Key Times
Choose which key times this production runs on (unit call, catering, craft, meals, first shot, wrap) with Add time, or add one of your own. Remove a time and its value is kept for when you add it back. Use these times on new call sheets makes the set the default.
Location Contacts
Base camp, technical base, and crew parking contacts go straight on the call sheet. Leave a section empty and it hides itself in the PDF rather than printing a blank heading.
Exporting with Sides
Set the paper size under Paper, then click Export. Choose call sheet only, call sheet plus sides, or sides only. With sides, the day's script pages go behind the call sheet in one PDF, so cast and crew get one attachment. The sides take the same options as the standalone Sides tool: optional header and footer, the previous scene heading, script or shooting order, and the meta-paragraph toggles. The sides follow the board: they hold the scenes scheduled on the day when you export, so a scene moved to another day goes with it.
The Next Day
Fill the next day from the schedule and your key contacts, department calls and the parts you chose to print come across from the day before. The times that belong to the day, such as the meals and every cast time, are yours to set again.
Shoot Days and Dates
Shoot days get their dates from the Production schedule. A shoot day is a date typed Shoot in a shooting block's lane, and shoot days are numbered in date order, so Day 1 is always the earliest date.
How Dates Are Set
- On Schedule > Production schedule, set the block's start date and tick the weekdays it shoots on (Monday to Friday unless you change it).
- Type the number of shoot days in the toolbar. The days take the block's next Shoot dates.
- Paint prep, rehearsal, travel and off days where you need them. The shoot days take the dates that are left, in board order.
- Open a shoot day to set its call and wrap times, location and notes in the day panel.
Moving a Shoot Day
The stripboard's day breaks follow the shoot dates. A day's scenes and call sheet stay with its place on the board and take that place's date, so dragging a day to a new place on the board gives its scenes, call sheet and transport the date of that place. On the Production schedule, drag a shoot day to another date and the board follows. Painting a shoot date another type moves the later shoot days on by one date, with their scenes and call sheets.
Where the Dates Appear
- The End of Day markers on the stripboard show each day's date
- The Day Out of Days uses the dates to work out hold days and availability
- Call sheets show the date in their header
- Conflict detection checks actor and location availability against the dates
- The budget counts shoot days and calendar weeks from them
Production Schedule
The production's calendar, from prep to post. Each part of the production is a lane, and every date inside a lane shows its day type.
Views
- Calendar: One month, with every date inside a lane showing its day type. This is where you paint and move days.
- Overview: A small grid for every month of the production, colored by day type, with shoot days numbered and holidays outlined in red. Click a month's name to open it in the Calendar view.
- Timeline: Every lane drawn date by date, from prep to post. Shoot days show their number, other working days show as lighter tints with their initial, and Picture lock and Delivery show as a diamond.
Lane Types
Every lane has a Type, chosen at the top of its lane panel (open it with the pencil beside the lane in the Timeline view). The type sets the day types the lane can paint:
- Shoot: Shoot, Prep, Rehearsal, Travel, Off and Wrap days
- Prep: Prep, Scout, Casting, Rehearsal, Travel and Off days
- Post: Edit, VFX, Sound, Color, Mix, Review and Off days, plus Picture lock and Delivery as one-day milestones
- Other: Work and Off days
The weekdays ticked in the lane's Shoots on row (Works on for the other types) get the lane's main type: Shoot, Prep, Edit or Work. Holidays are always Off, and every other date is Off until you paint it.
Shooting Blocks
Only Shoot lanes are shooting blocks. They have a stripboard and numbered shoot days, and they appear in the block selector on the Script and Schedule pages. To add a block:
- Switch to the Timeline view and click Add lane. The lane panel opens with Type set to Shoot.
- Give it a name (e.g., "Main Unit"), set its start and end dates, and choose a color.
- The block appears in the block selector across the Script and Schedule pages.
Every new project starts with one block, and you can add as many as you need, for example "Second Unit", "Pick-up Days" or "Reshoots". Once a project has two or more blocks, the block selector at the top of the Script and Schedule pages also has New shooting block, which takes a name, dates and a number of shoot days.
A lane of another type stays on the timeline and the calendar but never appears in the block selector. Changing a Shoot lane to another type keeps its shoot days and stripboard; change it back to Shoot and they return.
A block's start and end dates set the window the Day Out of Days lays out. Drag a lane on the timeline to move it, and its shoot days move with it, with their scenes and call sheets. Drag an edge to change its range; a block keeps its number of shoot days and never ends before the last of them.
Painting Days
Pick a type in the Paint dropdown in the toolbar, then click a date in a lane to give it that type, or drag across several dates. A paint goes to the lane on that date that has the type: Edit to a Post lane, Scout to a Prep lane. You can also right-click a date and choose its type, or press a letter key (S for Shoot, P for Prep, E for Edit and so on). Every paint can be undone.
Shift-click picks every date from the last date you clicked, and Cmd-click (Ctrl-click on Windows) adds or removes one date. Set type in the bar above the calendar gives the picked dates one type in a single step.
The Day Panel
Click a date to open it in the day panel on the right. Change its type with the chips at the top. For a shoot day, the panel also holds the call and wrap times, the location, notes and the day's scenes, saved as you leave each field. Open on stripboard and Call sheet take you to that day on those pages.
Events and Holidays
Add production events to the calendar (production meetings, location scouts, table reads, a wrap party). Each event has a name, date, start and end time, location, notes, priority, category, color, attendees, and an optional repeat. Holidays block out dates and are always Off.
Exporting
Use Export in the toolbar to share the schedule as PDF or Excel, with a live preview. Choose a layout: Lanes draws each phase as a color bar across a date axis, while Table lists one row per phase with its dates, duration, region, and notes. Tick "Shooting lanes only" to leave out prep, post, and admin phases.
Day Out of Days
The Day Out of Days (DOOD) chart shows when each cast member is needed across the full production schedule. It's an industry-standard document used to track actor working days, hold days, and availability. The same grid also shows your crew's days and the days each breakdown element is used.
How It Works
The DOOD is generated from your stripboard and the shoot dates on the Production schedule. Rows are characters/actors, columns are dates. Each cell shows a status code indicating what that actor is doing on that day. Statuses are auto-calculated but can be manually overridden.
The chart spans the dates of the shooting block you've selected, from its start date to its end date. Switch blocks to move to another window, and extend a block on the Production Schedule to stretch the chart, and the change shows up immediately, no restart needed. Every category uses the same dates.
Categories
The Category menu, first in the toolbar, picks what the grid shows. It lists All, then a People section and an Elements section:
- People: Cast (the characters and their actors), Crew (each crew member's painted days), and people categories from the breakdown such as Background actors and Stunts
- Elements: every breakdown category with promoted elements in the block, such as Props, Vehicles and Wardrobe, each with its row count
- All: every category in one grid
Categories with nothing in them are left out, and the page remembers the last category you picked. Export offers the same choice: All prints one section per category, each starting on its own page, and element categories print in the Day out of Days format with their work, hold and scene totals.
Status Codes
These are the industry-standard codes used in the chart:
Hold Rules
When an actor has a gap between their work days, FilmBase fills it in for you. A short gap is paid as Hold, so the actor is retained on the schedule, the way a weekly performer is paid for the days in between. A longer gap drops the actor and picks them back up on return, so you don't pay for the time off. The line between the two is the gap setting in the Hold rules dropdown on the toolbar; change it and the chart redraws on the spot.
Not everyone is held the same way. Leads are usually on a weekly deal and accrue hold days; day players and background are hired by the day and don't. The Hold rules dropdown lets you choose which cast tiers get auto-painted holds, and whether weekend days inside a gap are held. Turn a tier off and its actors' auto-filled holds drop away, on the chart and in the cast budget alike, while holds you set by hand are left untouched. Set this per project from the toolbar, or set the defaults every new project starts with under Settings.
Painting Days
The chart shows every date in the block's window, not just the days that have scenes on them, so travel, fittings and rehearsals have somewhere to live. Pick what a click does from the Paint menu, then:
- Click any date cell to set it: Hold, Travel, Rehearsal, Fitting, Drop, or Pickup. Click it again to clear it
- Drag across a row to paint a run of days, and drag back over them to erase. A drag follows whatever the first click did
- Click a date in the header to apply it to everyone on that day
- Anything you set by hand stays when the automatic status codes update
In the Crew category, painting over a prefilled shoot day asks you to confirm, so the schedule doesn't change by accident. Tick "Don't warn me again" to skip it from then on, or turn it off for everyone in Settings.
Conflict Detection
FilmBase automatically flags issues on the DOOD:
- Turnaround violations: When rest between consecutive shoot days is less than the minimum (default 10 hours)
- Actor conflicts: When an actor is scheduled on a day they've marked as unavailable
- Calendar conflicts: When a shoot day overlaps with a rehearsal, fitting, or travel day
Locations
Manage all your shooting locations: real-world addresses, base camp details, parking, hospitals, and availability.
Adding a Location
- Navigate to Schedule > Locations and click Add Location.
- Enter the real-world location name and address.
- Paste GPS coordinates or a map URL: FilmBase parses coordinates from most map URL formats automatically.
- Fill in additional details: base camp address, tech parking, crew parking, nearest hospital, and contact info.
Linking Script Locations
Your script contains location names from scene headings (e.g., "INT. WAREHOUSE"). These need to be linked to real-world locations; several script locations can share one real-world location. Unassigned script locations sit in a collapsible panel on the left: drag a chip onto a location card to assign it, or drag it back into the panel to unassign. This link is used by the stripboard optimizer to group scenes at the same physical location.
You can also assign without leaving the breakdown: the Scene Tags panel's Locations card shows where the selected scene shoots. Right-click it to assign the script location to an existing real-world location, or create a new one on the spot. One assignment covers every scene with that slugline.
Merging Locations
When the script names one set two ways, tick the script locations that are the same set, choose the name to keep and click Merge. The other name is kept as an alias, so the merge holds when you edit the script or import a revision, and the merge can be undone. Script locations can also be merged in the import dialog, before anything is saved.
To combine two real-world places, choose Merge places on the one to keep and tick the others. Their script locations, call sheet entries, availability and photos move to the place you kept.
Shoot Days & Budget
Every real-world location is also a production element in the Locations category. Each location card shows how many scenes shoot there and how many unique shoot days they're scheduled on, calculated live from the stripboard. Set a rate on the location's element in the Element Manager and import it into the budget like any prop or vehicle, and the line item follows the schedule as shoot days move.
GPS Coordinates and Distances
Paste a Google Maps link into a location and FilmBase reads its latitude and longitude, or type them in yourself. FilmBase works out the distances between locations on your computer, with no internet needed. The optimizer uses them to keep travel down, the route planner uses them to time pickups, and call sheets use them to fetch the weather.
Availability Calendar
Set available and unavailable date ranges per location (e.g., a venue is only available certain weeks). This availability feeds into the conflict detection system: if you schedule a scene at a location on a date it's unavailable, you'll see a warning on the stripboard and DOOD.
Drivers & Transport
Manage transport logistics: driver assignments, pickup schedules, and transport manifests for each shoot day.
Setting Up Drivers
- Navigate to Schedule > Drivers.
- Select a shoot day from the toolbar.
- The Morning Call run is auto-populated with actors scheduled for that day based on your master scenario stripboard.
- Assign a driver to each passenger by selecting from your driver contacts, or mark them as Self-Drive.
- Enter pickup time, pickup location, dropoff time, and dropoff location for each assignment. Travel time calculates automatically.
Transport Runs
Each shoot day has default runs: Morning Call and Wrap. You can add custom runs for other needs (Tech Scout, Location Recce, etc.). Each run has its own scheduled time and passenger list.
Tick Wrap run on a run that takes people home from the set. Its time is when it leaves, and no pickup times are worked out for it.
Days, Calendar, Vehicles and Fuel
The switch at the top of the Drivers page moves between each day's transport runs, a calendar of the drivers' days, the fleet and the fuel log. On Days, filter by driver, and each day shows its vehicles under its runs. Marking someone as a driver also puts them on the crew.
Planning a Route
Plan route on a run with passengers works out which driver picks up whom, in what order and at what time, so everyone is on set by the call (or, for a wrap run, dropped home). It uses GPS locations, not maps: straight-line distance times a road factor, at an average speed you set.
- Choose Plan route on the run.
- Check the set location and the time to be on set by. For anyone without a location, paste a Google Maps link or coordinates and choose Set; it's saved to their contact.
- Tick the drivers to use and set their seats, choose what to aim for (least driving, shortest rides or fewest vehicles), and choose Plan routes.
- Check each driver's stops and times, then Apply to run. Undo puts the run back as it was.
Pickups are timed backwards from the call, so nobody waits at the set. Keep driver holds a passenger with the driver they already have. Anyone who can't be placed in time or for lack of seats is listed.
The set location's coordinates come from Schedule > Locations. A road factor around 1.3 to 1.5 matches most road networks.
Vehicles, Trip Sheets and Fuel
Under Vehicles, keep the production's vehicles with their seats and fuel type. Each day, give each driver a vehicle and its start and end odometer readings; a driver without one is offered the vehicle they drove last.
The fuel log records fills from receipts. From full tanks FilmBase works out consumption and cost per kilometer, and each trip's share of the fuel, which the Vehicles and fuel report uses.
Where Transport Data Appears
Driver assignments aren't isolated: pickup and arrival times automatically appear on the cast rows in your Call Sheets. You can also export a dedicated Driver Report PDF with the full daily transport manifest.