Budget
Budget Summary
An executive-level dashboard showing your production's financial health at a glance.
- Overview cards: Total Budget, Total Spent, Variance, Pre/Production/Post breakdowns
- ATL/BTL: Above the Line and Below the Line totals (when enabled)
- Charts: Pie chart (budget breakdown by category), bar chart (Estimated vs Actual)
- Alerts: Over-budget categories highlighted with variance amounts
- Top spenders: Ranked list of highest actual expenditures
- Navigation: Click any category to drill into the Detailed Budget
Budget Templates
A budget template is a chart of accounts: the categories and account codes for a production, ready to fill in. Starting a new budget from one saves you building the structure by hand.
Open New Budget from Template from the budget toolbar. Templates are grouped by production type, and Film has four that differ by budget level.
- Short Film and Low-Budget Feature: fewer categories, with departments combined (art covers props and construction; grip and electric merge).
- Mid-Budget Feature: the traditional breakout, with art direction, set dressing, props, and construction as separate accounts.
- High-Budget Feature: adds dedicated Assistant Directors, Stunts, Second Unit, and VFX accounts.
- Micro Drama (Vertical Series), TV Drama Series, Documentary, Commercial, and Music Video cover the other formats.
Each cast and crew department comes with placeholder people at a rate of zero, so you can build a budget straight away, or delete them and bring in real people and rates by right-clicking a line and choosing Add Cast… or Add Crew…. Templates carry your fringe groups and global groups, including each tiered fringe's brackets. Schedule globals, such as shoot days, stay linked to the schedule, so in a new project they take that project's own counts. Fringes on each person still come from their rate card.
A template holds the budget's structure and figures, not links to one project's people, cast, sets, script elements or sub-budgets. A line in a foreign currency keeps it when the target budget has a currency with the same code, and otherwise uses the base currency. Applying a template either completes in full or changes nothing.
When a template or an import replaces a budget that already has expenses, each expense moves to the line in the new budget with the same account code. If some expenses are on lines the new budget does not have, FilmBase says how many and their total before it replaces anything. Those expenses are kept, and Actuals lists them under Unassigned expenses until you move each one to a line.
Insurance and contingency are math rows rather than typed figures: each is a percentage of the production categories, so the amount changes as the rest of the budget does. Click either row to change the percentage or which categories it covers.
Built-in templates are listed under FilmBase Templates and use your project's currency. You can also save any budget as a template, or drop .fbtemplate files into ~/Documents/FilmBase/Templates; your own templates appear under My Templates and can carry their own currency.
Detailed Budget
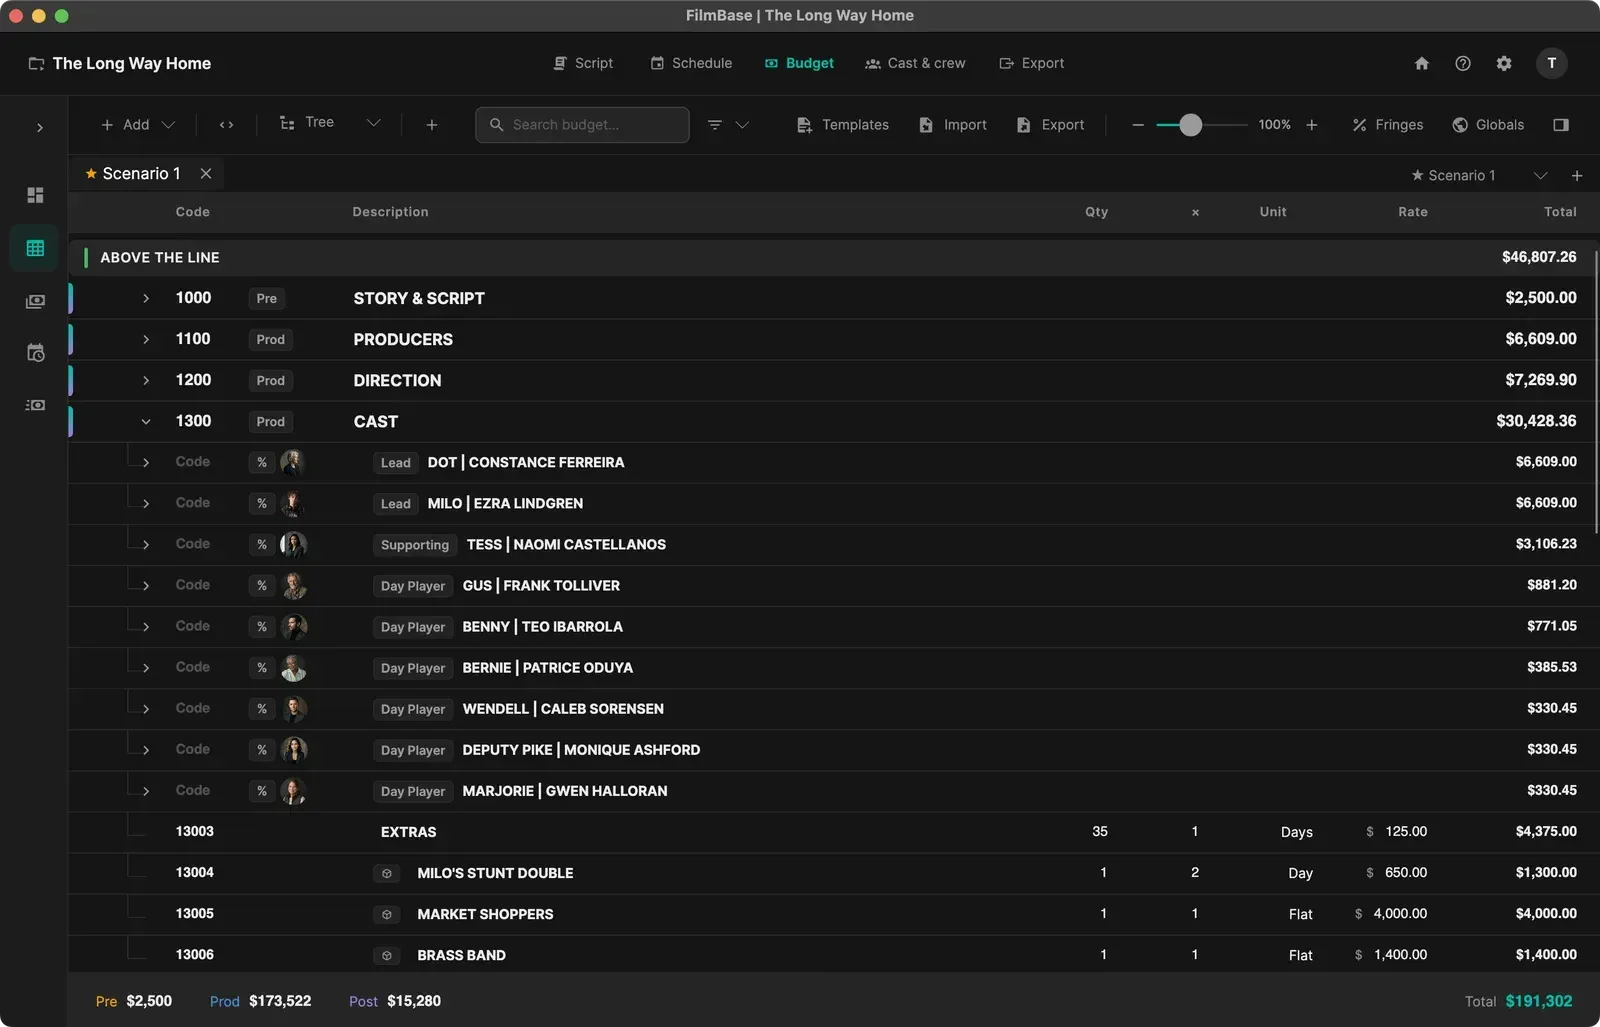
The core budgeting tool. Build your production budget line by line with a 4-level hierarchy: Categories > Accounts > Details > Sub-Details.
Building Your Budget
- Navigate to Budget > Detailed Budget in the sidebar.
- Add a top-level Category (e.g., "Camera", "Art Department", "Talent").
- Inside each category, add Accounts (e.g., "Director of Photography", "Camera Rental").
- Inside accounts, add Detail rows for individual line items with rate, quantity, and unit.
- For more granularity, add Sub-Detail rows inside detail rows.
Detail Lines and Totals
Only a line with nothing under it, a detail line, carries a quantity and a rate. A line with lines under it is a total: its amount is the sum of the lines under it. Fringes applied to that parent line are charged on its children's total.
When a line that has its own figures gets its first child, it becomes a total, and its own quantity, rate, fringes, linked globals and expenses move into a first child line, so nothing is lost and the total stays the same.
Duplicate and Paste give the copies new account codes, numbered with the settings saved in Settings > Budget > Account Codes.
View Modes
- Tree View: Hierarchical expand/collapse showing all levels at once. Click the arrow next to any row to expand or collapse it.
- Drilldown View: Navigate level by level with a breadcrumb trail. Click into a category to see its accounts, click an account to see its line items. Use the breadcrumb to navigate back up.
Using Formulas & Global Variables
Instead of typing a fixed number, you can enter a formula in the rate or quantity fields. For example, type =[Total Shoot Days] * 350 to price a line across every shoot day.
Define global variables in Project Settings > Budget > Globals, such as a day rate or a crew size, and reference them in any formula across the budget. When you change a variable, every formula using it updates. Formulas refer to variables by name, so each name can be used once, and renaming a variable rewrites the new name into every formula that uses it.
Formulas accept a comma as the decimal separator, the same as the other number fields. A formula that cannot be worked out is not saved: FilmBase says why, and the line keeps what it had.
Globals from the Schedule
The schedule keeps a set of globals up to date for each lane of the Production schedule. They carry a calendar icon, and because the schedule owns them, they can't be edited or deleted by hand. A line linked to one updates whenever the schedule changes.
- Shoot days: one per shooting block, named after the block ("Block 1 Shoot Days"), plus "Total Shoot Days" across all blocks
- Prep and rehearsal days: a block's dates typed Prep or Rehearsal, when it has any ("Block 1 Prep Days")
- Prep, post and other lanes: one per day type the lane has dates of, such as "Post Edit Days" or "Prep Scout Days", so an editor's or a scout's line can follow the schedule. These never count as shoot days.
- Weeks: each day global has a week global next to it, such as "Block 1 Shoot Weeks" or "Post Edit Weeks", counting the calendar weeks the dates fall in. A short first or last week counts as a fraction. "Total Shoot Weeks" adds up the shoot weeks of all blocks.
- Extra days: the shoot days past the lane's normal week, such as a Saturday on a 5-day lane ("Block 1 Extra Days")
Weekly Rates by Calendar Week
A weekly rate is counted by calendar week. When a line has a weekly rate and its multiplier is linked to a schedule global, it counts the calendar weeks the lane works in, so a 5-day week and a 6-day week are one week each.
Select the line and open Item in the inspector. Weekly rate covers sets how many days of a week the rate pays for; it starts at the number of days the lane works each week, which is 5 unless you change it. Days over that number in one week are extra days at the day rate, and an extra day that falls on a premium day, such as a 6th day, is charged at the premium if the project uses one. A shoot of five, six and five day weeks on a 5-day deal is three weeks plus one extra day. The panel shows how the total adds up.
Math Rows
Insert a math row to calculate a percentage of other rows. For example, add a "10% Contingency" row that automatically computes 10% of selected categories or line items. The value updates whenever source items change. In the built-in templates, insurance and contingency are math rows for this reason, so you can see and change what they're a percentage of instead of typing a figure.
Units
Choose from time-based units (Days, Weeks, Months, Hours) or standard units (Allow, Flat, Per, Rate). You can also use shorthand like "10w 2d" (10 weeks and 2 days) and FilmBase will convert it automatically.
Number entry is forgiving about decimal style, which matters if your computer is set to a comma locale. "1.5" and "1,5" both read as one and a half, and "1,234.56" and "1.234,56" both parse. Rate cells take digits and a single decimal separator; Amount and Units also accept expressions like "3+2" or "10 days".
Multi-Currency
If your production spans multiple countries, assign different currencies to individual line items. Set up currencies and exchange rates in Project Settings > Budget > Currency.
To change the base currency, choose Set as base on another currency with Convert values on. Every figure keeps its value: line rates, totals overrides, extra-day and rate card rates, income and, for the master budget, expenses are converted at the exchange rate.
Deleting a currency that budget lines are priced in asks first. Those lines move to the base currency at the currency's exchange rate, so their totals stay the same.
Inspector Panel (Right)
The collapsible right panel has two modes: toggle between them using the icons at the top of the panel:
Item Mode: When you click a line item, the inspector shows its details:
- Applied Fringes: All available fringes are listed. Click to toggle a fringe on or off for that item. Shows the fringe name, its rate (a percentage, or an amount per day, hour or week), and whether it's statutory.
- Linked Global Variables: Shows globals linked to the item's Rate, Multiplier, or Amount. Click an available global to link it. Click the unlink button to remove.
- Total Override: For parent items or categories, apply a global variable to override the calculated total.
- Assigned Set & Groups: Manage set and group assignments for filtering.
Settings Mode: Create and manage globals and fringes without leaving the budget:
- Fringes tab: Click + Create New Fringe to add a fringe with a name, how it is charged (a percentage with an optional cutoff, or an amount per day, hour or week worked), and statutory flag, or tick Tiered for a graduated bracket table instead of one rate. A sub-tab lets you create Fringe Groups (bundles of fringes applied together).
- Globals tab: Click + Add to create a global variable with a name, value or formula, target field (Rate, Multiplier, Amount, or Total), and unit type. A sub-tab lets you create Global Groups.
Visual Indicators
Budget rows show icons so you can see at a glance which items have fringes or globals applied:
- % icon (green badge): Appears in the row's tags area when fringes are applied. Hover to see how many fringes.
- Globe icon (blue badge): Appears in the tags area when a global is applied as a total override.
- Small globe badge on columns: A small circular indicator appears on the Rate, Multiplier, or Amount column when a global variable is linked to that specific field. On a field linked to a schedule global, the line follows the schedule and updates when it changes.
- Database icon (green): Indicates the item is linked to a breakdown element.
- File icon: Indicates a sub-budget item.
Right-Click Menu
Right-click any budget row for a full context menu:
- Add Sibling / Add Child: Insert items at the same level or nested inside
- Insert Sub-Budget: Reference another budget scenario
- Import Elements: Pull in elements from the breakdown
- Duplicate / Cut / Copy / Paste: Standard clipboard operations
- Change Color: Apply a row color (Red, Orange, Yellow, Green, Teal, Blue, Purple, Pink)
- Set Section: Mark as Above the Line or Below the Line (categories only)
- Set Production Phase: Tag as Pre-Production, Production, or Post-Production (categories only)
- Apply Global Variable: Select a global to link to this item
- Apply Fringe: Toggle a fringe on this item (leaf items only)
- Set Currency: Assign a specific currency (leaf items only)
- Convert to Math Row / Formula Row / Standard Row: Change the row type
- Insert Subtotal Below: Add a calculation row summing items above
- Manage Groups / Assign Set: Organize for filtering
- Delete: Remove the item
Fringes
Fringes are payroll overheads (tax, insurance, pension, benefits) applied to line items. Most are a percentage of the line's cost, with an optional cutoff. A fringe can also be a set amount per day, hour or week worked (see below). Create them in the inspector panel's Settings mode, or in Project Settings > Budget > Fringes. To apply a fringe, select a line item and toggle it in the inspector's Applied Fringes section, or right-click and use Apply Fringe.
On a generated cast or crew member, fringes apply to the wage days (shoot, hold, travel, rehearsal, fitting) and not to reimbursements like per diem, kit, housing, or airfare. A capped fringe, one with a cutoff, is taken against the person's total wages rather than each day line, so the cap comes out right.
Select the person's parent line and the inspector applies fringes to that line directly, then lists its child lines with a checkbox each, so you choose what counts toward the fringe base (wage lines in, per diem and other reimbursements out). Imports pre-set these for you. Under the applied fringes, the inspector shows each fringe's rate, its cap if it has one, the base it's calculated on, and the resulting amount.
Tiered Fringes
Tick Tiered on a fringe when one percentage isn't the whole story. Most statutory payroll contributions are graduated: a rate on the first band of earnings, a lower rate on the next, nothing above a ceiling. A cutoff can only switch a fringe off at a threshold, so it cannot express that.
A tiered fringe gets a bracket table instead of a single Rate %: From, To and Rate per band, with the last band's To left empty for "and everything above". Each band is charged at its own rate and the results are added together, which is how a payroll bureau arrives at its number. Leave no gaps between bands and don't let them overlap; FilmBase says so while you type without stopping you mid-edit. Cutoff is hidden on a tiered fringe, because the top band's ceiling already says it.
Fringes per Day, Hour or Week
Union health and welfare is often a set amount for each day or hour worked. In a fringe's form, set Charged as to Amount per day worked, Amount per hour worked or Amount per week worked, and enter the amount. The same choice is in Budget settings, on project rate cards and in the Rate Card Library.
The fringe is charged on the time a budget line works: its quantity (Amount × Multiplier) in the line's unit, so two people for 20 days is 40 days. Lines in hours count hours, lines in weeks count the days their weekly rate covers (5 if not set), and a month counts as 52 ÷ 12 weeks. Hours and days are converted with the fringe's hours per day (10 if not set). A line in Flat, Each or any other unit gets nothing from this kind of fringe, and a parent line charges it on the time of its children.
The amount is in the project's base currency and has no cutoff. Overtime, double time and meal penalties are not priced in the budget, so hours worked past a normal day count only when they are in the line's quantity.
The Budget Summary shows a Fringe Summary: every fringe rolled up to a per-fringe total across the whole budget, so you can see what each one costs at a glance.
Cost by Supplier
Your budget is organized by account (Camera, Grip, Lighting), but one vendor often supplies several of them. Cost by Supplier flips the view around and totals each supplier's committed cost across every account it appears in, so you can see how much you're spending with a vendor overall. Each line counts at the total the budget grid shows: converted to the base currency, priced by the schedule, and with its fringes. Lines in groups excluded from the totals are left out. Open it from the filter dropdown (the funnel icon) next to the search box. A supplier that spans more than one account expands to show the per-account breakdown, with a grand total for all suppliers at the bottom.
Suppliers appear here once you attach them to line items: right-click a budget account and choose Add from Supplier to pull in a vendor's items; those costs are what the rollup totals. It's a quick way to spot a vendor you lean on across departments before you lock a package rate.
Other Features
- Sub-budgets: line items that reference other budget scenarios
- Groups and sets for filtering and organizing line items
- Cut/copy/paste with full undo/redo
- Account code auto-generation with configurable numbering schemes (Settings > Budget > Account Codes); new, duplicated and pasted lines are numbered with the scheme you saved
- Budget scenarios: right-click a scenario's tab and choose Delete scenario. The master scenario cannot be deleted while its lines carry expenses; make another scenario the master first
Cast Budgeting & Tiers
FilmBase works your cast costs out straight from the schedule. Add a character to the budget and it reads their Day out of Days, charging each kind of day at its own rate (work, hold, travel, rehearsal, and fitting) from the assigned actor's rate card. Per diem, kit rental, housing and airfare are added on where the rate card defines them. Per diem and allowances come from each person's own rate card, so travelers and locals are paid differently.
Adding Cast to the Budget
- On the Detailed Budget, right-click the category or account and choose Add Cast.
- The picker lists your characters with their assigned actor and a live cost preview, and flags anyone whose actor has no rate card yet.
- Each chosen cast member becomes a line showing the character with the actor (CHARACTER | Actor) and their avatar, expanding into a line per day type.
- Cast and crew lines re-price themselves when the schedule, the Day out of Days, the actor assignment, a deal, a rate card, a role, the weekdays a block shoots on, or a unit changes. Edit a rate by hand and your override is kept on the next re-price; other figures typed on these lines are replaced, so change the deal or the schedule instead.
- Crew shoot days that fall on a public holiday are paid at the holiday premium, using the production's holidays from the calendar.
Hold Threshold
Whether a gap between shoot days counts as a paid hold or a drop is set by the hold-day threshold in Project Settings > Region (Cast & Schedule). The Day out of Days and the budget share it, so they always agree.
Daily, Weekly, Monthly, or Flat Deals
A person's rate card sets how their deal bills: per day, week, month, or a single flat fee. A daily deal gives the full day-by-day breakdown; a flat deal is one line. Rate cards live in a library you reuse across projects and in each project (see Ratebook).
A weekly deal counts the calendar weeks of the person's prep, shoot, hold and wrap dates. Weekly rate covers (days) on the rate card sets how many days a week the rate pays for; leave it blank to use the number of days their shooting block works each week. Days over that number in one week are extra days at the day rate, with the project's premium when one applies. Choose whether a short first or last week is pro-rata (that fraction of the weekly rate) or a full week.
Turn on auto-convert (on the contact's Rates tab) and a daily deal bills each full calendar week at the weekly rate. Days over a week, and the days of a short week, bill by the day, capped so a short week never costs more than a full one.
Weeks are calendar weeks, starting on the day set in Project Settings > Region and format > Week starts on. What counts as a month comes from your unit settings (Project Settings > Budget > Units). A project default sets auto-convert and the SAG-vs-pro-rata choice for the whole show (Project Settings > Region > Billing Defaults), and any one contact can override it. On a budget line, switch the line's unit between day, week, and month to pull that person's matching rate; type a rate to override it and it stays until you clear the field. The same billing applies to crew.
Cast Tiers
Tiers classify your cast: Lead, Supporting, Day Player, Background, or your own. They're defined once for your whole workspace in Global Settings > Cast Tiers and shared by every project. Assign a tier to a character on the Characters page, or in a contact's Cast Details; an actor who plays more than one part gets a tier per role. Tiers show as a color chip on the character, in the contact list as Tier | Character, and on the budget.
Multiple Shooting Blocks
Cast cost is worked out per character from that character's shooting block, so each line reflects a single block's schedule; costs are never blended across blocks. If the same actor works across two blocks, you add each block's character as its own line; keep them under separate categories to track what each block costs.
Actuals
Track real expenses against your budget. Each expense is linked to a budget line item for instant variance analysis.
- Status tracking: Scheduled, Paid, Overdue, Due Soon
- Variance: Color-coded Estimated vs Actual comparison
- Expense panel: Add/edit expenses per line item with amounts, dates, and descriptions
- Receipts: Attach the receipt or invoice to each expense
- Paid to: Record who received the money: one of the project's contacts, or a supplier's name for a one-off payment. Set it in the expense form or on the expense card. It appears on the Proof of payments report, the payment schedule and the expense exports.
- ATL/BTL sections: Above/Below the Line grouping supported
Unassigned Expenses
An expense whose line is no longer in the budget, for example after a template or import replaced the budget, is kept and counts in no total. A banner on Actuals says how many there are and their total. Choose Show unassigned expenses, open one, choose a line under Move to a budget line and click Move to this line.
Marking an Expense Paid
Mark as paid gives the expense a paid date: the expense's own date when that is today or earlier, and today when its date is in the future. This works the same everywhere you can mark an expense paid.
Payment Schedule
A matrix view tracking when budget amounts are due. Rows are line items (grouped by category), columns are dates.
- Zoom levels: Monthly, Weekly, or Daily granularity
- Cell data: Total amount, expense count, and status (paid/overdue/due soon/scheduled)
- Summary totals: Total Estimated, Total Actual, Total Variance, Overdue Count, Upcoming Count
- Actions: Add payments, mark as paid, bulk mark entire categories as paid
- Configurable date range for the visible window
Cashflow
Cashflow shows money in from your income sources and money out from your budget's expenses, period by period.
- Cards: expected cash today (counting money paid or due by today), the lowest point ahead and the next money in
- Chart: money in and out as bars, and the running balance as a line that turns red below zero
- Opening balance: a field on the Cashflow toolbar for the cash on hand before the first money in or out. The running balance, the cards, the PDF and the Excel export start from it. The figure is saved with the budget, and Undo takes a change back.
- Zoom: switch between Month, Week and Day
- Sources: right-click a source to add a payment tranche or delete the source; double-click a cell to add a payment there or edit the one it holds
Money out uses the same dates as the Payment Schedule: paid expenses on their paid date, and unpaid ones on their scheduled payment date.